Hello everyone,
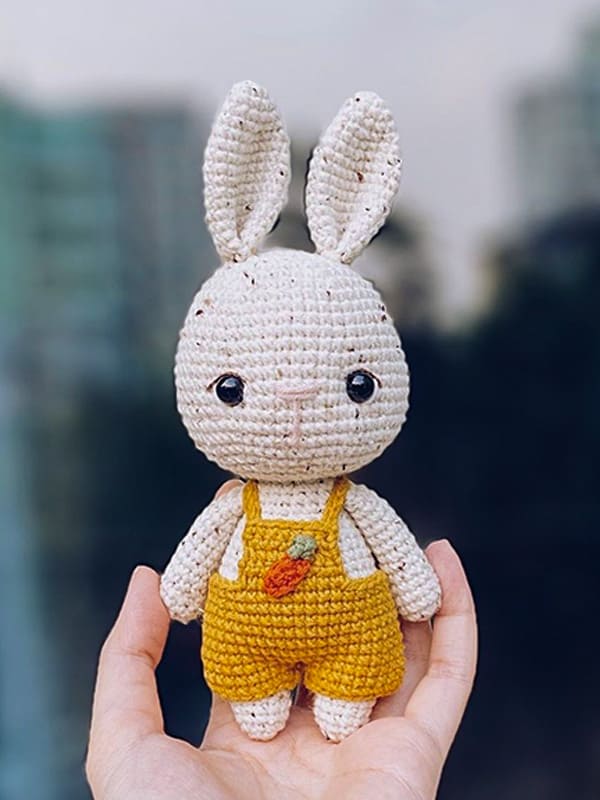
For those who love amigurumi, I shared the cute bunny pattern today. You can do it step by step very easily. You can crochet the Amigurumi bunny pattern for children and your loved ones and give them a surprise gift. Thank you to the creator of the amigurumi bunny pattern. Amigurumi bunny is very easy to make. We will crochet the legs and body of the free pattern together. We will crochet the arms and head separately. After all the parts are completed, let’s assemble them in the body part. You can make the orange jumpsuit outfit of the Amigurumi pattern a different color. You can make the eyes of the Amigurumi bunny pattern using plastic accessories. Do not forget to add the hazelnut bunny amigurumi pattern to your favorite list.
Hazelnut The Little Bunny PDF Amigurumi Free Pattern
Designer
Instagram: @littlefish.crocheterie
Materials
• Crochet hook: 2,5 mm
• Yarn: Size 2 (Fine)
• A pain of 8 mm safety eyes
• Stuffing
• Pins, tapestry needle, scissors
TIPS
• Crochet in continuous spiral unless otherwise stated.
• Make invisible decrease to avoid gaps and holes in your work.
• Stuff your doll as you go and stuff tightly to get the night shape.
Legs
Make 2, start with body color yarn.
Rnd 1. 6 sc into a magic ring (6)
Rnd 2. (sc, inc) x 3 (9)
Rnd 3. (2 sc, inc) x 3 (12)
Rnd 4-5. 12 sc (12)
Rnd 6. 5 sc, inc, 6 sc (13)
Rnd 7. 13 sc (13)
Rnd 8. Left leg: 6 sc, inc, 6 sc
Right leg: 5 sc, inc, 7 sc (14)
Rnd 9. 14 sc (14)
Left leg: Cut the yarn and fasten off.
Right leg: Ch 3, don’t cut the yarn, continue crocheting the body.
Stuff the legs firmly.
After crocheting the legs of the amigurumi rabbit, let’s crochet the body part 🙂
Body
Continue with the yarn on the right leg.
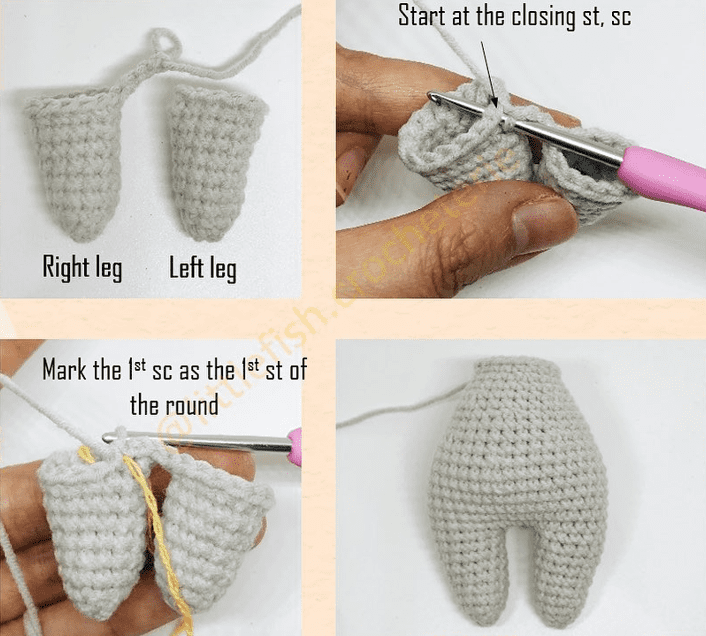
Rnd 1. Join the legs: (34)
On the left leg: stant at the closing st of the left leg, 14 sc, 3 sc into the ch 3
On the night leg: 14 sc, 3 sc into the ch 3, 14 sc, 3 inc, 14 sc, 3 inc (40)
Rnd 2. 14 sc, 3 inc, 14 sc, 3 inc (40)
Rnd 3-7. 40 sc (40)
Rnd 8. (8 sc, dec) x 4 (36)
Rnd 9. 36 sc (36)
Rnd 10. 3 sc, dec, (7 sc, dec) x 3, 4 sc (32)
Rnd 11. 32 sc (32)
Rnd 12. (6 sc, dec) x 4 (28)
Rnd 13. 28 sc (28)
Rnd 14. 2 sc, dec, (5 sc, dec) x 3, 3 sc (24)
Rnd 15. (4 sc, dec) x 4 (20)
Rnd 16. 20 sc (20)
Rnd 17. 20 sc (20)
Fasten off and leave a long tail for sewing to the head. Stuff the body firmly.
Let’s crochet the arms and ears of the amigurumi bunny 🙂
Arms
Make 2, start with body color yarn.
Rnd 1. 6 sc into a magic ring (6)
Rnd 2. 6 inc (12)
Rnd 3-5. 12 sc (12)
Rnd 6. dec, 10 sc (11)
Rnd 7. dec, 9 sc (10)
Rnd 8. dec, 8 sc (9)
Rnd 9-14. 9 sc (9)
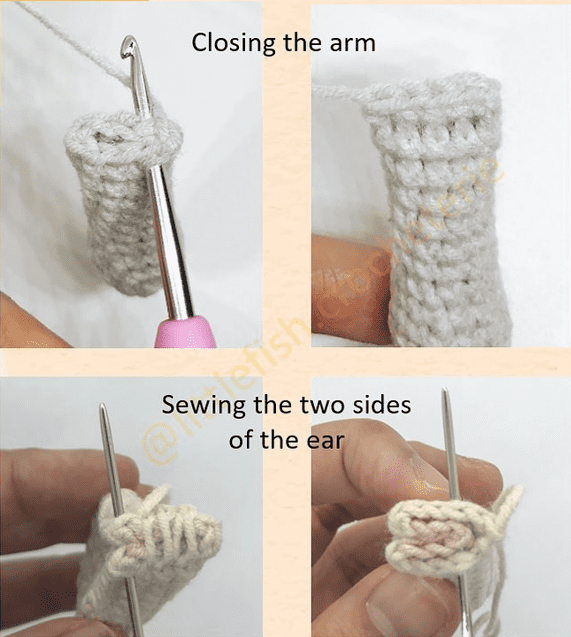
Stuff the arm (do not stuff too tightly). Flatten the open end of the arm, aligning stitches side by side. Close the open end by crocheting 4 sc through botj sides. Cut the yarn and leave a long tail for sewing.
Ears
Make 2, start with body color yarn.
Rnd 1. 6 sc into a magic ring (6)
Rnd 2. (sc, inc) x 3 (9)
Rnd 3. (2 sc, inc) x 3 (12)
Rnd 4. 12 sc (12)
Rnd 5. (2 sc, inc) x 4 (16)
Rnd 6. 16 sc (16)
Rnd 7. (3 sc, inc) x 4 (20)
Rnd 8-15. 20 sc (20)
Fasten off and leave a long tail for sewing. Fold the ear and sew the two sides together.
Let’s crochet the amigurumi bunny’s head 🙂
Head
Start with body color yarn.
Rnd 1. 8 sc into a magic ring (8)
Rnd 2. 8 inc (16)
Rnd 3. (sc, inc) x 8 (24)
Rnd 4. (3 sc, inc) x 6 (30)
Rnd 5. (4 sc, inc) x 6 (36)
Rnd 6. (5 sc, inc) x 6 (42)
Rnd 7. (6 sc, inc) x 6 (48)
Rnd 8-11. 48 sc (48)
Rnd 12. (7 sc, inc) x 6 (54)
Rnd 13-16. 54 sc (54)
Rnd 17. (8 sc, inc) x 6 (60)
Rnd 18. 4 sc, inc, (9 sc, inc) x 5, 5 sc (66)
Rnd 19. (9 sc, dec) x 6 (60)
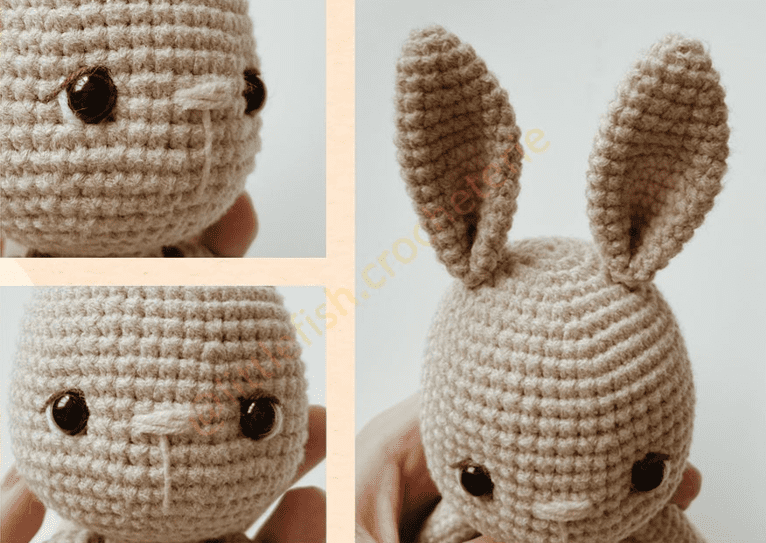
Place the safety eyes between round 15 and round 16 with a distance of 11 sts between them.
Rnd 20. 4 sc, dec, (8 sc, dec) x 5, 4 sc (54)
Rnd 21. (7 sc, dec) x 6 (48)
Rnd 22. (4 sc, dec) x8 (40)
Rnd 23. (3 sc, dec) x 8 (32)
Rnd 24. (2 sc, dec) x 8 (24)
Rnd 25. (2 sc, dec) x 6 (18)
Rnd 26. (sc, dec) x 6 (12)
Rnd 27. 6 dec (6)
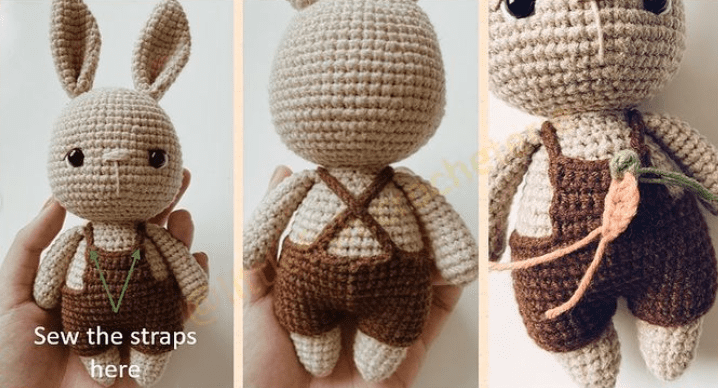
Stuff the head firmly. Cut off and weave the yarn into 6 front loops of the last round to close the hole and hide the yarn inside the head. Decorate the face by sewing nose using light pink yarn. Use white and thin brown yarn to decorate the eyes. Sew the ear to the head. Sew the arms to the body, and finally sew the head to the body.
Let’s crochet the outfit of the amigurumi toy. You can use any color yarn you want. 🙂
Overalls
Start with dark brown yarn. To make the pants, join each round with a slst to the 1st then ch 1, the 1th st of the next round will be at the same st as the joining slst. First, make 2 identical pieces.
Ch 21, join with a slst to the first ch to make a circle.
Rnd 1. Ch 1, 21 sc, join with a slst (21)
Rnd 2. Ch 1, 21 sc, join with a slst (21)
The first piece: Cut yarn and fasten off.
The second piece: Don’t cut the yarn. Continue with the yarn on the second piece, connect 2 pieces with a slst worked into the 1th st of the first piece.
Rnd 3. Ch 1, 21 sc on the first piece, 21 sc on the second piece, join with a slst (42)
Rnd 4. Ch 1, inc, 19 sc, 2 inc, 19 sc, inc, join with a slst (46)
Rnd 5-7. Ch 1, 46 sc, join with a slst (46)
Rnd 8. Ch 1, 5 sc, dec, 9 sc, dec, 10 sc, dec, 9 sc, dec, 5 sc, join with a slst (42)
Rnd 9. Ch 1, 9 sc, dec, 19 sc, dec, 10 sc, join with a slst (40)
Rnd 10. Ch 1, 4 sc, ch 25, then start in the 2nd ch from the hook, 24 slst. Continue to 32 sc, ch 25, start in the 2nd ch from the hook, 24 slst. Continue to 4 sc to the end of the round, join with a slst. Cut the yarn and fasten off.
Mark 2 sts separated by 10 sts on the front.
Attach red yarn to the st at the 1th marker.
Rnd 11. Ch 1, 11 sc from the 1th to the 2 nd marker (10)
Rnd 12. Ch 1, turn, 11 sc (10)
Rnd 13. Ch 1, turn, dec, 6 sc, dec, ch 1, turn (8)
Rnd 14-15. Ch 1, turn, 8 sc (8)
Fasten off and leave a long tail for sewing the straps. put the overalls on. Sew the straps to the overalls.
The Little Carrot
Start with orange yarn
Ch 5, start in the 3nd from the hook
2 hdc, sc. Fasten off, leave a tail for sewing.
Attach green yarn to make leaves, ch 4, slst to the same st. Fasten off, leave a tail for sewing. Sew the carrot to the overalls.
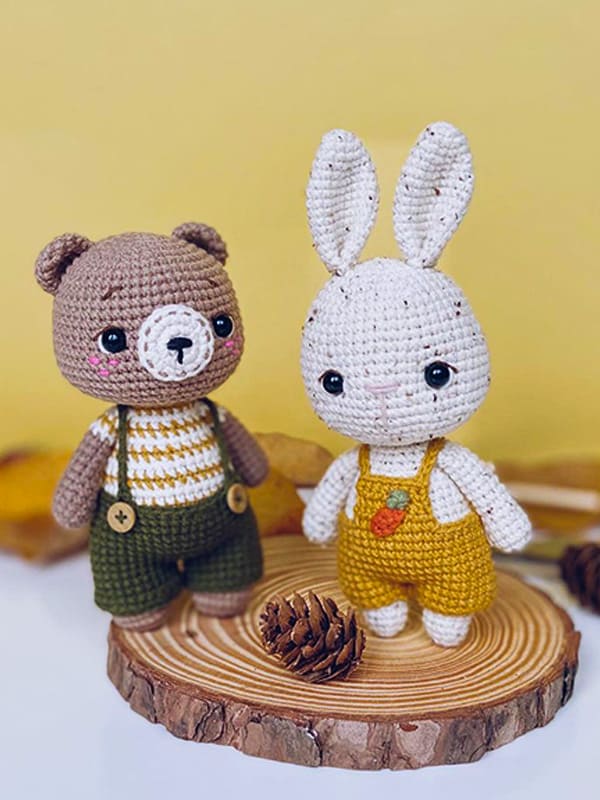
Congratulations, you have completed the amigurumi bunny pattern. 🙂


 Bear
Bear Bunny
Bunny Cat
Cat Christmas
 Crochet doll
 Deer
Deer Other animals

