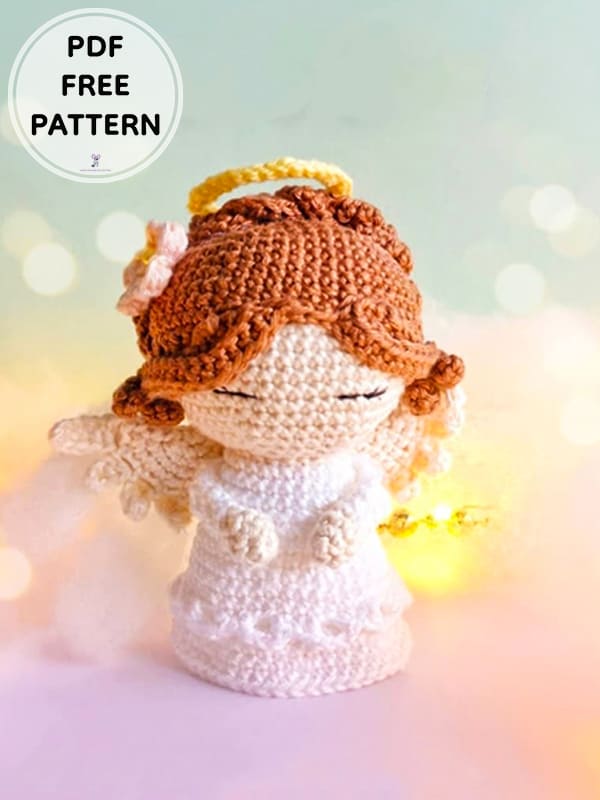
Hello to everyone who loves amigurumi,
Today I shared the Christmas angel amigurumi pattern for you. I have added small images to the description section so that you can easily make the free amigurumi pattern step by step. Amigurumi doll will be 10 cm in size when completed. Amigurumi doll is of medium difficulty. You can crochet the amigurumi Christmas angel pattern for children or for your loved ones. You can use it for decor in your home and office. You can use the amigurumi toy as a crib ornament. You can crochet the amigurumi angel pattern in different colors. Thank you to the creator of the amigurumi christmas angel pattern. Don’t forget to add it to your favorite list and share it with your loved ones.
PDF Christmas Angel Amigurumi PDF Pattern
Designer: littleyarnpotato
Abbreviations
MR– magic ring
Sc– single crochet
Hdc– half double crochet
Dc– double crochet
Tr– treble crochet
Inc– increase
Dec– decrease
Ch– chain
BLO– back loop only
FLO-Front loop only
St(s)– stitch(es)
Slst– slip stitch
(..)– indicates the number on stitches you should have at the end of each round
(..) x n – repeat instructions in brackets n times
Materials
• 4 ply 100% cotton yarn (I used Scheepjes Catona yarn)- or any yarn of your choice in the following colours: brown, white, off- white, yellow, pink
• 2,20 mm crochet hook (or hook yhat is apprepriate for the yarn you’re using)
• Black embroidery thread
• Stuffing
• Scissors
• Sewing needle and pins
• Stitch markers
Size: Your Christmas Angel will be around 10cm tall you are using similar materials
Head
Yarn; off-white
Rnd 1. 6sc in MR (6)
Rnd 2. inc x 6 (12)
Rnd 3. (inc, sc) x 6 (18)
Rnd 4. (inc, 2sc) x 6 (24)
Rnd 5. (inc, 3sc) x 6 (30)
Rnd 6. (inc, 4sc) x 6 (36)
Rnd 7. (inc, 5sc) x 6 (42)
Rnd 8. 42sc (42)
Rnd 9. (inc, 6sc) x 6 (48)
Rnd 10-15. 48sc – 6 rnds (48)
Rnd 16. (dec, 6sc) x 6 (42)
Rnd 17. 42sc (42)
Rnd 18. (dec, 5sc) x 6 (36)
Rnd 19. (dec, 4sc) x 6 (30) Begin to stuff head
Rnd 20. (dec, 3sc) x 6 (24)
Rnd 21. BLO- (dec, 2sc) x 6 (18)
Rnd 22. (dec, sc) x 6 (12)
Rnd 23. (dec) x 6 (6)
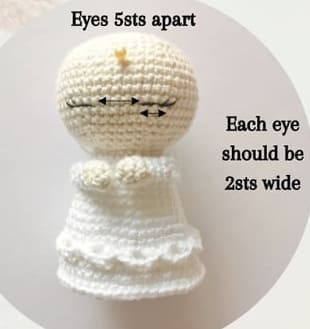
Finish stuffing head. Fasten off and cut the yarn, leaving a yarn tail to weave the yarn, leaving a yarn tail to weave through the FLO of the last round. Pull tight to close the hole and weave the yarn tail in. You can now embroider
the eyes, between Rnd 14-15 of the head, 2sts wide, and 5sts apart. Embroider 2 eyelashes for each eye.
Body & Dress
Start with off-white yarn
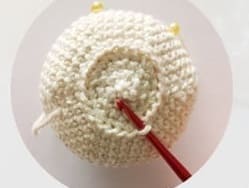
Rnd 1. Turn head upside down and pull up a loop in the remaining FLO from rnd 20 and ch 1. Starting in same st as the ch 1, 24sc.
Change to white yarn
Rnd 2. (inc, 3sc) x 6 (30)
Rnd 3-6. 30sc -4 rnds (30)
Rnd 7. (inc, 4sc) x 6 (36)
Rnd 8. 36sc (36)
Rnd 9. (inc, 5sc) (42)
Rnd 10-11. 42sc -2 rnds (42)
Rnd 12. BLO 42sc (42)
Rnd 13-14. 42sc – 2 rnds (42)
Rnd 15. (inc, 6sc) x 6 (48)
Rnd 16. 48sc
Fasten off and sew in the yarn tail.
Angel Dress Ruffle
Yarn; white
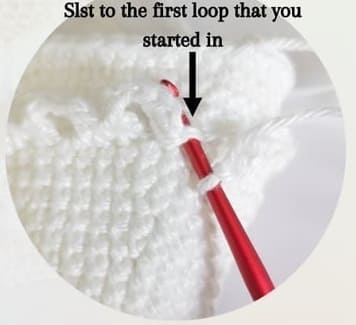
Turn Angel upside down, insert hook in the of the FLO from Rnd 11. Pull up a loop and ch 1. Work the first st of the ruffle (i.e the dc) in this st.
Ruffle: (dc in the st, ch3, skip 1 st, dc in next st, slst in next st) x 10, then dc in next st, ch3, skip 1 st and slst into the first loop.
Arms (x2)
Start in off-white yarn
Rnd 1. 5sc in MR (5)
Rnd 2. (inc, 1sc) x 2, inc (8)
Rnd 3. 8sc (8)
Change to white yarn
Rnd 4. (dec, sc) x 2, dec (5)
Rnd 5-6. 5sc – 2rnds (5)
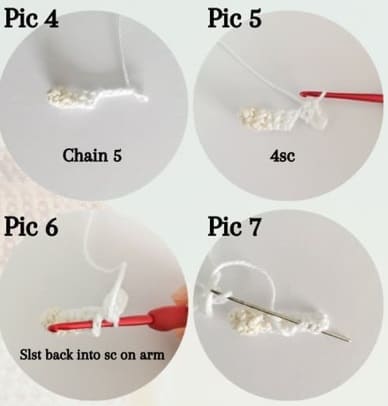
Do not stuff the arm. Fold the arm in half and 2sc through both layers of the opening to close, then without cutting the yarn. ch5 and from second ch on hook, 4sc and then slst back onto the next sc on the arm. Leave a yarn tail to sew. Weave in the yarn tail to the end of the arm for sewing.
Halo
Yarn; yellow
Ch 36. Slst to first st to join the round and then slst 35 all the way around.
Fasten off and cut the yarn. Invisible close off.
Flower
Start in yellow yarn
5sc in MR
change to pink yarn. Starting in the first st: (dc, tr, dc and slst all in the same st), repeat in the remaining 4 stitches (you should have five petals). Slst into first stitch to finish. Fasten off and cut the yarn. Weave in the yarn tail.
Angel Wings
Left wing
Yarn; off- white
Rnd 1. 6sc in MR (6)
Rnd 2. inc x 6 (12)
Rnd 3. (inc, sc) x 6 (18)
Rnd 4. (inc, 2sc) x 6 (24)
Rnd 5. (inc, 3sc) x 6 (30)
Fold circle in half, so that the stitches line up.
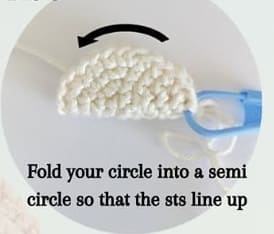
We will now make each of the individual 7 feathers (F1-F7)
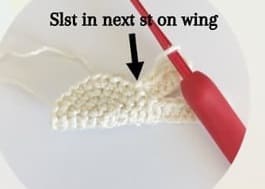
Note: When it says “slst into next st” ensure that you slst through both layers of the wing.
F 1. ch6, from 2nd st on hook, 2sc, 2hdc, 1dc, skip 1 st on the wing, slst into next st.
F 2-3. (ch5, from 2nd st on hook, 2sc, 2 hdc, skip 1 st on the wing, slst into next st)
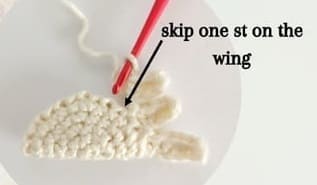
F 4. ch4, from 2nd st on hook, 3hdc, skip 1 st on the wing, slst into next st.
F 5-6. (ch3, from 2nd st on hook, 2hdc, skip 1 st on the wing, slst into next st)
F 7. ch2, from 2nd st on hook, hdc, skip 1 st on the wing, slst into next st.
Fasten off. Leave a long yarn tail for sewing.
Right wing
Yarn; off-white
Make Rnd 1-5 the same for the left wing. Fold the circle in half, so that the stitches line up.
We will now make each of the individual 7 feathers (F 1- F 7).
Note: When it says “slst into next st” ensure that you slst through both layers of the wing.
F 1. 1sc through both layer first then: ch2, from 2nd st on hook, hdc, skip 1 st on the wing, slst into next st.
F 2-3. (ch3, from 2nd st on hook, 2hdc, skip 1 st on the wing, slst into next st)
F 4. ch4, from 2nd st on hook, 3hdc, skip 1 st on the wing, slst into next st.
F 5-6. (ch5, from 2nd st on hook, 2sc, 2hdc, skip 1 st on the wing, slst into next st)
F 7. ch6, from 2nd st on hook, 2sc, 2hdc, 1dc, skip 1 st on the wing, slst into last st.
Fasten off. Leave a long yarn tail for sewing.
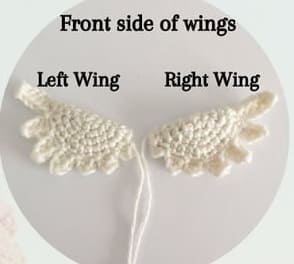
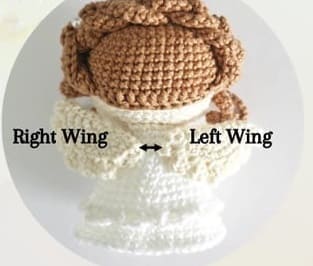
Sew the wings to the back of the body 1 st apart. Refer to picture for how the wings should look
Hair
Yarn; Brown
Rnd 1. 6sc in MR (6)
Rnd 2. inc x 6 (12)
Rnd 3. (inc, sc) x 6 (18)
Rnd 4. (inc, 2sc) x 6 (24)
Rnd 5. (inc, 3sc) x 6 (30)
Rnd 6. (inc, 4sc) x 6 (36)
Rnd 7. (inc, 5sc) x 6 (42)
Rnd 8. (inc, 6sc) x 6 (48)
Rnd 9-13. 48sc – 5rnds (48)
Rnd 14. sc in first st, then we will now work on the hair strands (S 1- S 8) for the angel:
S 1-2. (ch20, from second ch on hook 19sc, skip 1 sc on the hair, slst in next st), sc in next 2st
S 3-4. (ch20, from second ch on hook 19sc, skip 1 sc, slst in next st), sc, 3hdc, 2dc, slst in next st.
S 5-7. (ch30, from second ch on hook 29hdc, skip 1 sc, slst in next st), 11dc, slst in next st.
S 8-10. (ch30 from second ch on hook 29hdc, skip 1sc, slst in next st), 2dc, 3hdc, sc, slst.
Fasten off and leave a long yarn tail to sew hair to the head.
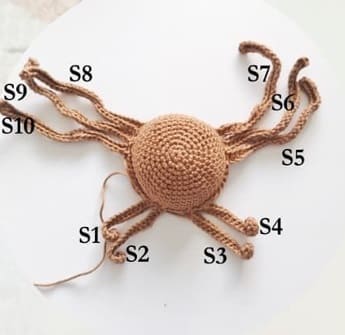
How to arrange the hair:
Plait S 5-7 to make the right braid and plait S 8-10 to make the left braid. Place the left braid and the right braid over the top of the hair, with the right braid in front of the left braid. Glue the braids or sew the braids in place to secure.
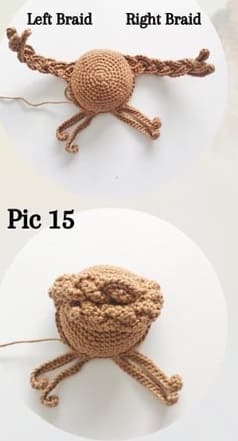
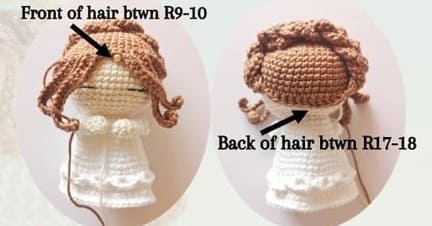
Pin the hair onto the head, with the front part of the hair falling between Rnd 9-10 of the head and the back part of hair falling between Rnd 17-18 of the head.
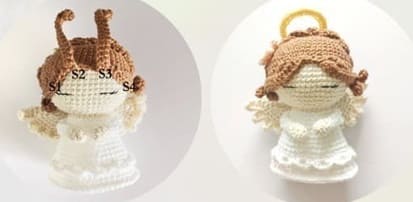
Sew/ glue S1 and S4 to the left and right side of the head, respectively.
Sew/ glue S2 over the top of S1 and
Sew/ glue S3 over the top of S4
Assembly
Arms: Sew the arms to the sides of the body. The arms should face forward. The top of the arm should fall around Rnd 3. The bottom of the arm should fall around Rnd 5.
Halo: Secure the halo on the hair with a couple of stitches onto the back braid.
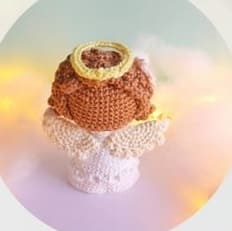
Flower: Pin or sew flower at the left side of the front braid.
Congratulations, you have completed the amigurumi angel pattern. 🙂


 Bear
Bear Bunny
Bunny Cat
Cat Christmas
 Crochet doll
 Deer
Deer Other animals


Que lindura. Gracias
Ya lo voy a hacer otra mi Árbol de navidad
Me encanta. Es demasiado lindo.
Voy a hacerlo
Gracias por compartir