![]()
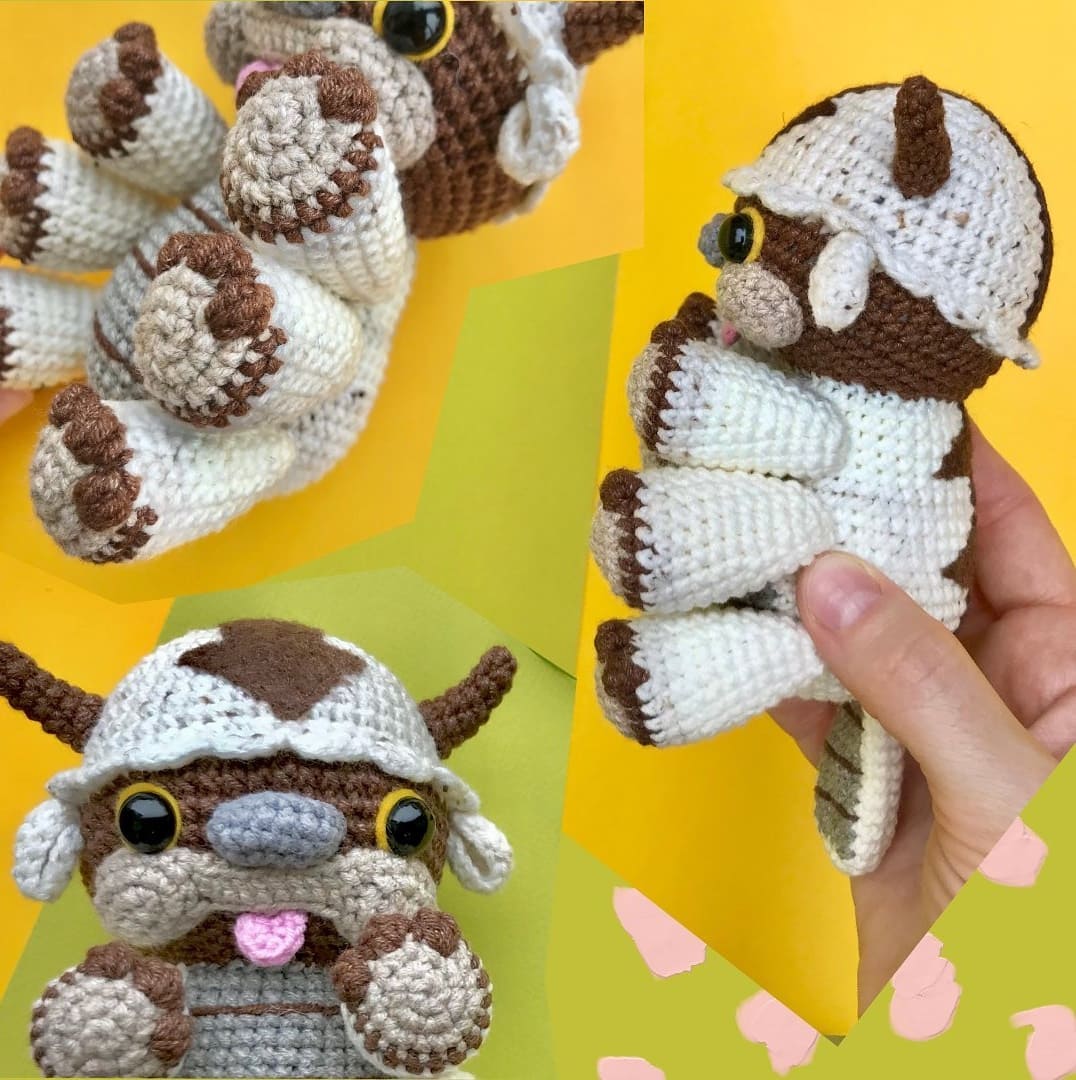
Hello everyone, we are with you with the free pattern of Appa avatar amigurumi, a fictional animal in the animation series The Last Airbender. Thank you very much to the owner of the pattern. Your children will love the Appa Avatar amigurumi toy, the latest example of flying bison. It can be a great gift for those who love the last airbender animated series. Just follow the detailed step by step free pattern instructions and complete the amigurumi appa avatar toy right now. Don’t forget to follow us for more animal free amigurumi patterns.
Appa Avatar Crochet Bison PDF Amigurumi Free Pattern
Designer: billie_bosha
Materials
• Yarn alize cotton gold tweed, yarnart jeans.
• Crochet hook size: 1.5mm
• A piece of yellow or brown felt
Abbreviations
MR: Magic ring
Ch: Chain
Sc: Single crochet
Tr: Treble crochet
Inc: Increase
Dec: Decrease
Slst: Slip stitch
BLO: Back loop only
FLO: Front loop only
Dc3tog- Double crochet 3 together (Click the link to see how it’s done)
Head
Milk color.
Rnd 1. 6 sc in MR
Rnd 2. 6 inc (12)
Rnd 3. (1sc,inc)*6 (18)
Rnd 4. 1sc,inc,(2sc,inc)*5, 1sc (24)
Rnd 5. (3sc,inc)*6 (30)
Rnd 6. 2sc, inc, (4sc,inc)*5, 2sc (36)
Rnd 7. (5sc,inc)*6 (42)
Rnd 8. 3sc, inc, (6sc,inc)*5, 3sc (42)
Rnd 9. 42 sc
Change yarn to brown.
Rnd 10. BLO: 42 sc
Rnd 11-15. 42 sc
Rnd 16. (6sc,dec)*6 (36)
Rnd 17. (5sc,dec)*6 (30)
Rnd 18. (4sc,dec)*6 (24)
Rnd 19. (3sc,dec)*6 (18)
Rnd 20. (2sc,dec)*6 (12)
Rnd 21. (1sc,dec)*6 (6)
Rnd 22. 6 dec
Insert safety eyes between rounds 12 and 13. Make a yellow iris for the eyes from a piece of felt: cut out circles about 12 mm diameter, make holes in them and insert eyes into them.
The distance between eyes is 12 sts.
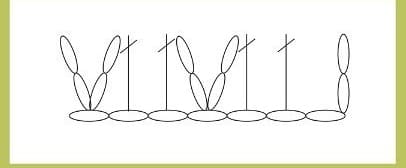
Fringe (Milk yarn)
Work FLO round 9, according to the diagram:

Nose (Gray yarn)
Make ch 8.
From the second ch from the hook:
Rnd 1. 5sc, 3sc in 1 stitch, 5sc, slst.
Rnd 2. ch 1, 13 sc, slst.

Tongue
Pink yarn.
Work 6 sc in MR. Do not close a ring. Leave an end for sewing.
Horns
Dark brown yarn.
Rnd 1. 5 sc in MR
Rnd 2-3. 5 sc
Rnd 4. inc, 2sc, inc, 1 sc (7)
Rnd 5-6. 7 sc
Rnd 7. 2 inc , 5sc (9)
Lightly stuff the horns, or do not stuff them at all.
They should have a curved shape.
Ears
Milk yarn.
Work 12 tr in MR. Fold the ear in half and sew to the head.
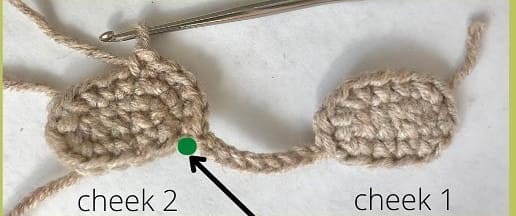
Cheeks
Beige yarn.
Work the first cheek: make ch6.
From the second ch from the hook:
Rnd 1. 3sc, 3sc in 1 stitch, 3sc, slst.
Rnd 2. (ch1, 1sc) in 1 stitch, then inc, 2sc, 3inc, 2sc, inc, slst.
Cut off the yarn.
Work the second cheek, but do not cut off the yarn.
1. Make ch8.
2. Join the first cheek and work 16 sc (on the first cheek)
3. 8 sc on the chain.
4. 16 sc on the second cheek.
5. 8 sc on the chain.
6. 2 slst on the 1st cheek.
Sew the cheeks to the head, stuff as you go.

Body
Rnd 1. milk: 6 sc in MR
Rnd 2. milk: 6 inc (12)
Rnd 3. gray: (1sc,inc)*2, milk: (1sc,inc)*4 (18)
Rnd 4. gray: (2sc,inc)*2, milk: (2sc,inc)*4 (24)
Rnd 5. gray: (3sc,inc)*2, milk: (3sc,inc)*4 (30)
Rnd 6. gray: (4sc,inc)*2, milk: (4sc,inc)*4 (36)
Rnd 7. gray: (5sc,inc)*2, milk: (5sc,inc)*4 (42)
Rnd 8. gray: (6sc,inc)*2, milk: (6sc,inc)*4 (48)
Rnd 9-14. gray: 16 sc: milk: 32 sc (48)
Rnd 15. gray: (6sc,dec)*2, milk: (6sc,dec)*4 (42)
Rnd 16-18. gray: 14sc, milk: 28 sc (42)
Rnd 19. gray: (5sc,dec)*2, milk: (5sc,dec)*4 (36)
Rnd 20-25. gray: 12sc, milk: 24 sc (36)
Leave a long end for sewing.
Tail
Rnd 1. milk: 6 sc in MR
Rnd 2. milk: 6 inc (12)
Rnd 3. milk: (1sc,inc)*4, gray: (1sc,inc)*2 (18)
Rnd 4-14. milk: 12 sc, gray: 6 sc
Legs (Make 6)
Rnd 1. beige: 6 sc in MR
Rnd 2. beige: 6 inc (12)
Rnd 3. beige: (1sc,inc)*6 (18)
Rnd 4. brown: dc3tog, 1sc, dc3tog, 1sc, dc3tog, 13 sc (18)
Rnd 5-10. milk: 18 sc (18)
Rnd 11. milk: (4sc,dec)*3 (15)
Rnd 12. milk: 15 sc (15)
Rnd 13. milk: (3sc,dec)*3 (12)
Rnd 14. milk: 12 sc
Rnd 15. (1sc,dec)*4 (8)
Stuff only 2/3 of the leg. Stuff the hole.
Thank you for visiting our website amigurumireceitas.com.
Sew all parts: cut an ornament from brown felt for the head, back and tail, sew it with sewing threads. Embroider strips of dark brown yarn on the belly and tail.


 Bear
Bear Bunny
Bunny Cat
Cat Christmas
 Crochet doll
 Deer
Deer Other animals


Hi! Thank you for this adorable Appa. I was wondering if row 8&9 of the head have the wrong stitch count. Since row 7 has 42 stitches and then in row 8 you increase by 6. Should the stitch count be 48?
Hello, you can click on the designer’s link and get training from him
I saw that too. If you stitch further counting from 48 at row 8 you should be fine. You will have to do an extra row in the end to close it.