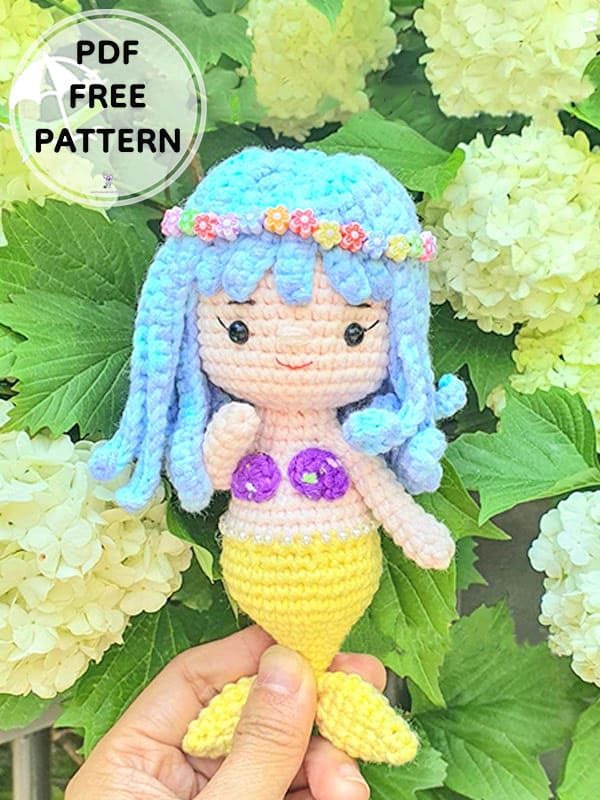
Hello to all of you, friends, we will work with you today crochet mermaid amigurumi pattern. Thank you very much to our designer for sharing her free crochet mermaid amigurumi pattern with us. With detailed step by step crochet mermaid pattern instructions, you will easily complete the amigurumi mermaid. It is an easy amigurumi pattern for beginners, so if you are just starting out, I recommend you try it. Take a look at our article right now to make a beautiful handmade crochet amigurumi toy for your children. Don’t forget to follow us for more crochet free amigurumi patterns.
Crochet Mini mermaid PDF Amigurumi Free Pattern
Designer: stuffedamigurumi
Abbreviations
MR– Magic ring
Ch– Chain
Sc– Single crochet
Inc– Increase
Dec– Decrease
Hdc– Half double crochet
BLO– Back loop only
St– Stitch
Slst– Slip stitch
Fo– Fasten off
I used milk cotton yarn size 2.5 mm, hook size 4/0.
Head
Rnd 1. 7 sc in MR
Rnd 2. 7 inc (14)
Rnd 3. (sc,inc)*7 (21)
Rnd 4. (2sc,inc)*7 (28)
Rnd 5. (3sc,inc)*7 (35)
Rnd 6. (4sc,inc)*7 (42)
Rnd 7-18. 42 sc
Rnd 19. (sc,dec)*14 (28)
Rnd 20. 14 dec
Fasten off.
Arms (Make 2)
Rnd 1. 6 sc in MR
Rnd 2-11. 6 sc
Fasten off. Leave a long tail for sewing.
Body
Yellow yarn.
Rnd 1. 4 sc in MR
Rnd 2. (sc,inc)*2 (6)
Rnd 3. 3sc, 3inc (9)
Rnd 4. 9 sc
Rnd 5. (sc,inc)*3, 3sc (12)
Rnd 6. (2sc,inc)*3, 3sc (15)
Rnd 7. (3sc,inc)*3, 3sc (18)
Rnd 8. (4sc,inc)*3, 3sc (21)
Rnd 9. (2sc,inc)*7 (28)
Rnd 10. (3sc,inc)*7 (35)
Rnd 11-13. 35 sc
Rnd 14. (3sc,dec)*7 (28)
Rnd 15. 28 sc
Change to skin color yarn.
Rnd 16-17. 28 sc
Rnd 18. (2sc,dec)*7 (21)
Rnd 19. 21 sc
Rnd 20. (sc,dec)*7 (14)
Link to arms.
Rnd 21. 3sc, 4sc on arm 1, skip 4sc on arm 1 and on the body, 4sc on the body, 4sc on arm 2, skip 4sc on arm 2 and on the body, 1sc on the body (14sc)
Rnd 22-23. 14 sc
F.O. Leave a long tail for sewing.
Finish tail (2)
Rnd 1. 4 sc in MR
Rnd 2. (sc,inc)*2 (6)
Rnd 3. (sc,inc)*3 (9)
Rnd 4. (2sc,inc)*3 (12)
Rnd 5-6. 12 sc
Rnd 7. (2sc,dec)*3 (9)
Rnd 8. (sc,dec)*3 (6)
Fasten off. Leave a long tail for sewing.
Hair (Wig)
Rnd 1. 8 sc in MR
Rnd 2. BLO 8 inc (16)
FLO 26ch- 25sc, slst in the same st, 26 ch- 25sc: slst next st, 26ch- 25sc,
slst in the same st, 26ch- 25sc…
Continue until 5 sts left. Slst next st, 9ch- 8sc, slst next st, 9ch- 8sc…
Continue to the end. This layer we will have 22 long strands and 5 short strands for the bangs.
BLO
26ch- 25sc, slst in the same st, 26ch- 25sc: slst next st, 26ch- 25sc, slst in the same st, 26ch- 25sc…
Continue to the end. This layer we will get 16 long strands.
Finish
• Fill the head, body with fiberfill.
• Assembly pieces as the sample.
• Safety eyes 6mm.
• Use pins to form the wig on the head, use hot glue gun to fix each strands/ layer. Put the wig upside down.
• Use small pearls, flower- shapped buttons for decoration.
• Shells on the chest: MR, ch1, 7 hdc, ch1, slst into the MR, tighten it. Glue the chest.


 Bear
Bear Bunny
Bunny Cat
Cat Christmas
 Crochet doll
 Deer
Deer Other animals

